


So I made a zipper pouch out of my selvages. I've been collecting these when I started sewing again. (I have 8 years of selvages!) I love them because they're so versatile & fun! I love seeing them and trying to remember what I used that particular print for. It's kinda like a fabric journal.... So let's gets started.
You'll need:
9" zipper
2 pieces of batting = 7.25" x 11.25"
2 pieces of lining = 7" x 11"
2 strips of fabric = 2" x 11"
A handful of selvages

With a marking pen, draw a line on your batting measuring 1.5" from the bottom. Do this to both pieces. The area above the line will be where you'll sew your selvages.

Grab 2 selvage strips and place them together like the photo below. One should be on top of the other overlapping at least 1/4".

Now top stitch as close to the edge of the selvage as you can. I highly recommend using a stitch length around 2.0.

Now grab more selvages....

and tuck them underneath...

and continue to top stitch....

Once you've finish the bottom half, sew the other selvages by placing them on top of the previous strip. No tucking under this time.


Place the 2" x 11" strip at the line.


Now work on your other panel. You can either do the same direction or do the opposite. I'm doing the opposite - simply based on my preference.

Attach the selvages the same way we did prior. Your panels should look like these.

Now let's give them a haircut. Align your ruler so that the seam lines up at 1.75". Then trim your block to 7" x 11".

Here's what they should look like....


It should look like this. Then, do the same to the other side.

Give it a good press away from the zipper.

I top stitch on both sides so the lining doesn't ride up and jam my zipper.

Now line up your panels to match like this...

and here... Use pins to hold them in place.

Stitch all the way around using a 1/4 seam allowance. But leave a small opening (about 3") so you can turn it out.

Trim your corners and then ....

Turn it out.... Pull! Tug! Do it gently...
Sew your opening either by hand or machine and that's it. You're done! Here's the front.

And here's the back.

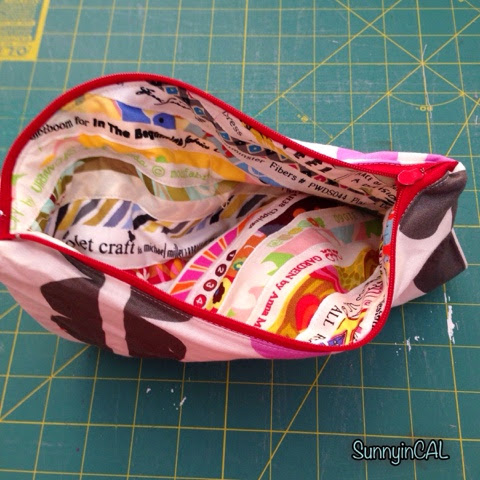
Look at how much stuff it holds! Those are my large scissors! My rotary cutter is buried at the bottom.

That's all folks! Now go make one! ;)

Hope you've been inspired to travel handmade. Enjoy!
Oxox,
Sunny
Thanks for a great tutorial!
ReplyDeleteI love selvedges too but it takes so long to save a decent quantity!
I have a group of friends that give me theirs
DeleteThis comment has been removed by a blog administrator.
ReplyDeleteLove this! Thanks for the step by step instructions and photos! Definitely want to try it... but yes accumulating selvages takes time.
ReplyDelete